Friday, February 26, 2016

Forensic Friday: Get-ForensicMftSlack


[This is a continuation of my Forensic Friday series.  Every Friday I provide a short post on a forensic topic of interest or PowerForensics functionality (such as cmdlet descriptions, use cases, and details about lesser known features). Subscribe to Invoke-IR so you don’t miss a Forensic Friday!]


Happy Friday and welcome to another installment of my Forensic Friday series. This week we are going to cover PowerForensics’ Get-ForensicMftSlack, a cmdlet that returns Master File Table (MFT) slack space. For those not familiar with the concept of slack space, it is simply defined as unused space on the disk. MFT slack is specifically the unused portion of a Master File Table record entry. By default, the Master File Table is composed of records that represent a partitions files and directories. Each MFT record has a set number of bytes reserved for it on the hard drive, typically 1024 bytes (the number of bytes reserved for the MFT record entry can be found in the Volume Boot Record). When a MFT record entry does not use all of the bytes that have been allocated to it, the remaining bytes are referred to as MFT slack space, an area on disk that attackers have been known to hide their tools.

Lets use PowerForensics to provide a specific example of MFT slack space. We start by using Get-ForensicFileRecord to get a specific FileRecord object (MFT record entry). Each FileRecord object has an AllocatedSize and a RealSize parameter. AllocatedSize represents the number of bytes that have been reserved for this particular MFT file entry, while RealSize represents the number of bytes that are actually being used by the entry.


Below you can see a hex dump of the MFT File Record. You can see the FILE0 signature and a couple human readable strings (such as “access.log”).


Now if we compare the output of Get-ForensicMftSlack, we see the same data that is at the bottom of the previous picture. This is the slack space! Sometimes slack space can contain contents of deleted files or file system structures.


The image below shows that the difference between AllocatedSize and RealSize is the same as the number of bytes returned by Get-ForensicMftSlack.


Common Use

Parse all Master File Table slack space for a given volume (Example using volume “C:”):

$bytes = Get-ForensicMftSlack -VolumeName C:


Parse MFT record based on Index/Record Number (Example with Index 0 on Volume N:):

Get-ForensicMftSlack -VolumeName N: -Index 0 | Format-Hex


Friday, February 19, 2016

Forensic Friday: Invoke-ForensicDD

[This is a continuation of my Forensic Friday series.  Every Friday I provide a short post on a forensic topic of interest or PowerForensics functionality (such as cmdlet descriptions, use cases, and lesser known features). Subscribe to Invoke-IR so you don’t miss a Forensic Friday!]

Happy Forensic Friday! This week I am taking us back to the basics with Invoke-ForensicDD. Pretty much every Forensicator/Incident Responder has used the Unix dd utility during their day, but I figured it’d be pretty cool to have a PowerShell implementation. This cmdlet provides read only access to the physical disk or logical volume, and returns the requested data as a byte array.

For a practical example of Invoke-ForensicDD, check out my Copying Locked Files with PowerForensics post. Not only does this show leveraging Invoke-ForensicDD to copy a locked file, the post also shows how PowerForensics builds on this functionality to provide more user friendly APIs.

Common Use
Like the unix dd utility, Invoke-ForensicDD has an -InFile parameter that should be used to point at the physical drive (\\.\PHYSICALDRIVE0) or logical volume (\\.\C:). An optional -OutFile parameter directs the output to a file instead of PowerShell’s output stream. The -Offset, -BlockSize, and -Count parameters provide instructions regarding what data to return (-Offset and -BlockSize must be divisible by the physical disk’s sector size, typically 512 bytes). Like Unix’s dd, -BlockSize represents the number of bytes to read at one time while -Count represents the number of BlockSize chunks to read. By default, -Offset has a value of 0 (the beginning of the file) and -BlockSize has a value of 512 (the smallest number of bytes that can be read at once).

This example reads 512 bytes from the beginning of the physical disk (\\.\PHYSICALDRIVE0) and passes the output to Format-Hex:

Invoke-ForensicDD -InFile \\.\PHYSICALDRIVE0 -Count 1 | Format-Hex


Read the first 512 bytes from the logical volume (\\.\C:) and write output to C:\evidence\VBR:

Invoke-ForensicDD -InFile \\.\C: -OutFile C:\evidence\VBR -Offset 0 -BlockSize 512 -Count 1


Thursday, February 18, 2016

Installing PowerForensics

If you are following my Forensic Friday posts, you probably know that I am making a concerted effort to write about my projects more frequently. PowerForensics has been the main focus of my blogging thus far in 2016, but I have not released a post describing how to "install" it. The rest of this post provides walkthroughs of installing PowerForensics from either the PowerShell Gallery or Github and why you would choose one method over the other.

Method 1: PowerShell Gallery

By far, the easiest way to install a PowerShell module is from the PowerShell Gallery. For anyone unfamiliar with the PowerShell Gallery, is described as "the central repository for PowerShell content" meaning PowerShell community members can host their code (modules, DSC resources, and scripts) on the Gallery. The major caveat with PowerShell Gallery is that the necessary cmdlets are only available in Window Management Framework (WMF) 5.

The image below shows the PowerForensics project page which includes details about the module such as the current version, release notes, and installation instructions.


To locate a module from the command line, use the Find-Module cmdlet with a keyword. In the example below, I search for any module whose name contains the word "Forensic". This query shows me that there are two modules PowerForensics and PowerForensicsv2 (PowerForensicsv2 is the PowerShell v2 compliant version of PowerForensics).


Once you have located the desired package, use Install-Module to download and install it (notice that I used the command from the Install section of the PowerShell Gallery project page). Install-Module will prompt you to make sure you know that you are downloading a module from the internet to which you should select "A". By default, the module will be installed in the %ProgramFiles%\WindowsPowerShell\Modules directory, which makes it available for all users. If you want the module to be accessible to only the current user  you can specify -Scope CurrentUser with Install-Module and it will be installed in the %UserProfile%\Documents\WindowsPowerShell\Modules directory.


Once PowerForensics is installed, we can use Import-Module to load the module into our current session and Get-Command, with the -Module parameter, to list the cmdlets exposed by the module.


Method 2: Github

Github is a popular code distribution site and also another way to download PowerForensics. Each major release contains three zip files; PowerForensics.zip, PowerForensicsv2.zip, and Source code. (Same as above, PowerForensicsv2 is the PowerShell v2.0 compliant version)
 

If you downloaded PowerForensics with Internet Explorer, you must “Unblock” the files. This can be accomplished by right clicking on the file and selecting properties. From the properties menu, check the Unblock box and click Apply

This step is necessary because Internet Explorer adds an Alternate Data Stream (ADS) named Zone.Identifier to all files downloaded through the browser. The Zone.Identifier indicates what security zone the file was downloaded from. PowerShell requires user interaction for all files downloaded from the internet, so unblocking allows us to skip this tedious step.


To finish installing PowerForensics, unzip the module into a directory in the PSModulePath like C:\Program Files\WindowsPowerShell\Modules\ import and go! For more information about PSModulePath check out this article.


You are now ready to use the PowerForensics PowerShell module! Subscribe to Invoke-IR to make sure you get the latest PowerForensics tricks and tips.


Friday, February 12, 2016

Forensic Friday: Get-ForensicUsnJrnl

[This article is a continuation of my Forensic Friday series.  Every Friday I will provide a short post on a forensic topic of interest or PowerForensics functionality (such as cmdlet descriptions, use cases, and details about lesser known features). Subscribe to Invoke-IR so you don’t miss a Forensic Friday!]

Welcome back to Forensic Friday! This week I want to highlight the Get-ForensicUsnJrnl cmdlet, which parses the $UsnJrnl file or NTFS change journal.The UsnJrnl is responsible for keeping track of file system operations such as file creation, deletion, and truncation. During an investigation I highly recommend inspecting the $UsnJrnl as it provides extremely detailed context about what has transpired on the file system. For example, this is especially helpful in providing details about a deleted and otherwise unrecoverable file.

Common Use

By default, this cmdlet parses the $UsnJrnl file (\$Extend\$UsnJrnl) on the system’s C: volume, but can be pointed at any logical volume. An exported $UsnJrnl file can be parsed using the -Path parameter in order to perform offline analysis. I’ve listed a few examples below. The -Usn parameter tells Get-ForensicUsnJrnl to parse and return a single entry.


Parse a volume’s UsnJrnl & store in $usn variable (Example using volume “C:”):
$usn = Get-ForensicUsnJrnl -VolumeName C:


Parse $UsnJrnl file based on path & store in $usn variable (Example path C:\$Extend\$UsnJrnl):
$usn = Get-ForensicUsnJrnl -Path ‘C:\$Extend\$UsnJrnl’

Parse $UsnJrnl entry based on Update Sequence Number (Example with Usn #1189553536):
Get-ForensicUsnJrnl -VolumeName C: -Usn 1189553536


Friday, February 5, 2016

Forensic Friday: Get-ForensicFileRecord

[This is the first article in my Forensic Friday series.  Every Friday I will provide a short post on a forensic topic of interest or PowerForensics functionality (such as cmdlet descriptions, use cases, and details about lesser known features). Subscribe to Invoke-IR so you don’t miss a Forensic Friday!]

Lets start with Get-ForensicFileRecord, the PowerForensics cmdlet I tend to use the most.  This cmdlet parses the Master File Table (MFT) of an NTFS formatted volume (more formats are in the works).  This function provides the base for all other NTFS based PowerForensics cmdlets and allows an analyst to perform a variety of different tasks (finding files, recovering deleted files, detecting timestomping, etc).  As always, please leave any questions or comments about this post below, maybe you’ll inspire the next Forensic Friday post!

Common Use

By default, this cmdlet parses the $MFT file on the system’s C: volume but can be pointed at any logical volume. The -Index and -Path parameters tell Get-ForensicFileRecord to parse and return a single MFT File Record. Lastly, an exported $MFT file can be parsed using the -MftPath parameter in order to perform offline analysis. I’ve listed a few examples below.

Parse a volume’s Master File Table and store in $mft variable (Example using volume “C:”):
$mft = Get-ForensicFileRecord -VolumeName C:

Parse MFT record based on Index/Record Number (Example with Index 0):
Get-ForensicFileRecord -Index 0

Parse MFT record based on file path (Example with C:\Windows\System32\config\SAM):
Get-ForensicFileRecord -Path C:\Windows\System32\config\SAM

Parse an exported Master File Table (Example for C:\evidence\MFT):
$mft = Get-ForensicFileRecord -MftPath C:\evidence\MFT


Copying Locked Files with PowerForensics

[Cmdlets referenced in this article must be run with Local Administrator or equivalent permissions]
Every Forensicator or Incident Responder has run into the dreaded ‘locked file’ at least once (probably A LOT more than once). Whether it is the Master File Table, UsnJrnl, or a Registry Hive, it seems that juicy forensic data is always contained in one of these locked files. One of my favorite PowerForensics features is the ability to find a file’s data on disk and access it directly, bypassing file system restrictions such as permissions and file locking. This feature is a key component of PowerForensics, forming the base on which all artifact parsing is built. The image below shows what happens when I try to use PowerShell’s Copy-Item cmdlet to make a copy of the SAM hive… I receive a “file in use” error.


Screenshot 2016-01-31 12.33.12.png


This post looks at three methods to copy a locked file with PowerForensics. For us to properly understand what is happening under the hood for each of these methods we must start by viewing the SAM hive’s Master File Table Entry (File Record). Get-ForensicFileRecord is PowerForensics’ cmdlet for parsing the Master File Table. In the image below we are using the Path parameter to look at the single entry for the SAM hive.


Screenshot 2016-01-31 12.35.57.png


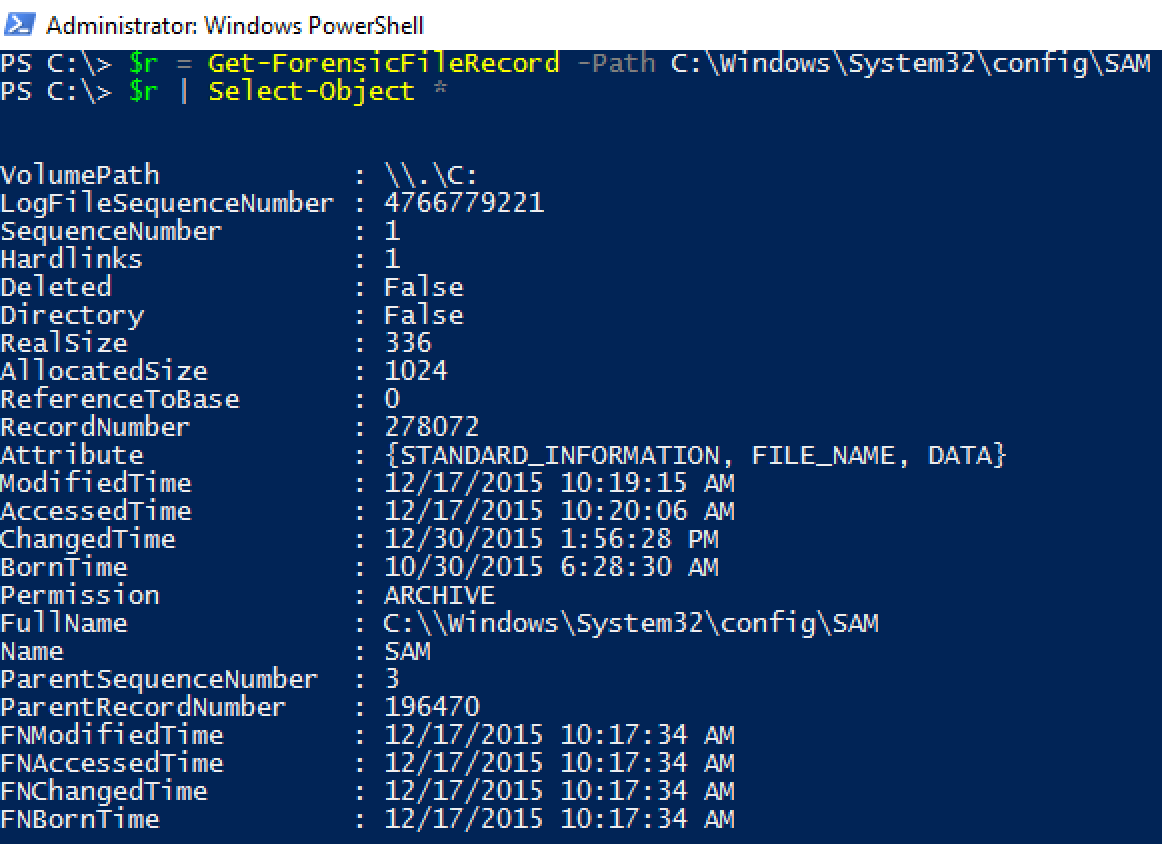
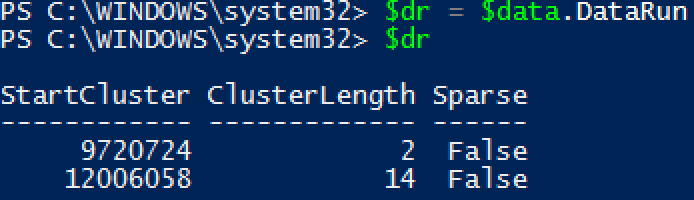
Get-ForensicFileRecord returns a FileRecord object representing a Master File Table entry. NTFS files store their content in two ways, resident or nonresident. If the data is resident, it is stored within the 1024 byte Master File Table Record which typically means it is less than 600 bytes. In most cases, the data is nonresident meaning it is stored elsewhere on the hard drive. In the case of nonresident file data, the Master File Table Record’s ‘DATA’ attribute contains pointers to the actual contents. In the following image we see that the SAM file’s contents are of the nonresident type, and we are able to drill in enough to see that the Data Runs are those pointers I talked about before.


Screenshot 2016-01-31 12.39.33.png


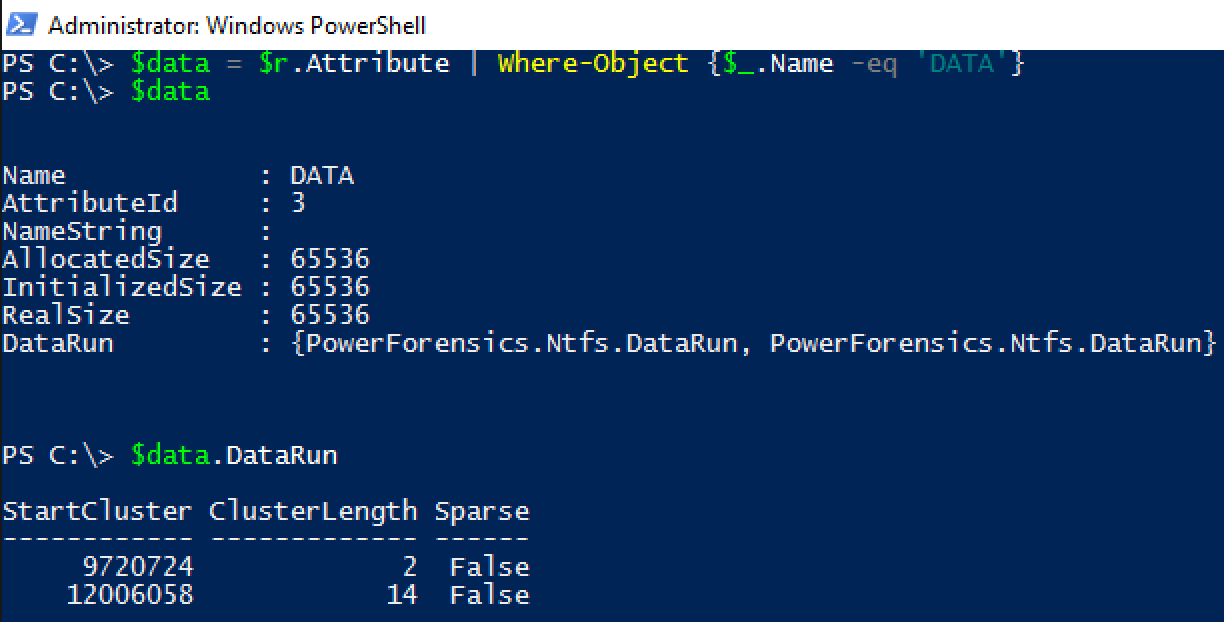
According to the Data Runs the SAM hive is a fragmented file that is made up of 2 clusters starting at cluster 9720724 and 14 clusters starting at cluster 12006058. The rest of this article explains three different methods that leverage this information to access the SAM hive’s content and copy it to a non-locked file that can be analyzed offline.

Method 1: Invoke-ForensicDD

Invoke-ForensicDD is my best effort at porting the classic unix disk duplicator (dd) utility to PowerShell. We can use this cmdlet to copy the bytes that represent the SAM hive without accessing the SAM hive (the file) directly.


Screenshot 2016-02-02 09.22.56.png


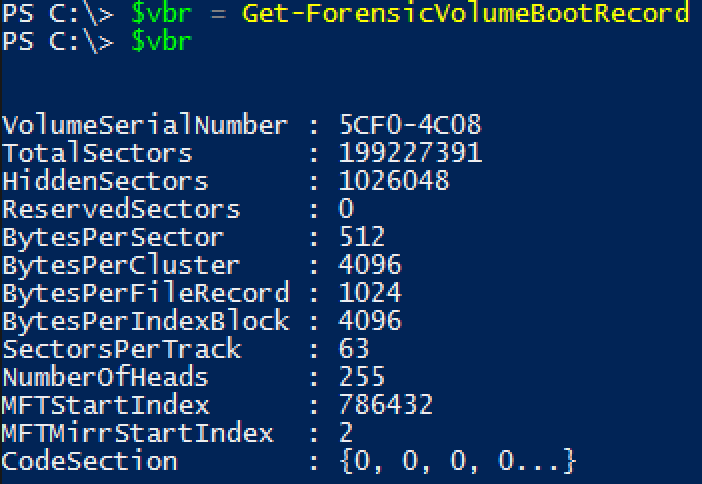
Now that we have the VBR we know that this volume is formatted with 4096 bytes per cluster. Next, let’s revisit the SAM Hive’s DataRun property. Remember that in this case we are dealing with a fragmented file which is why we see two DataRun entries.


Screenshot 2016-02-02 12.24.09.png


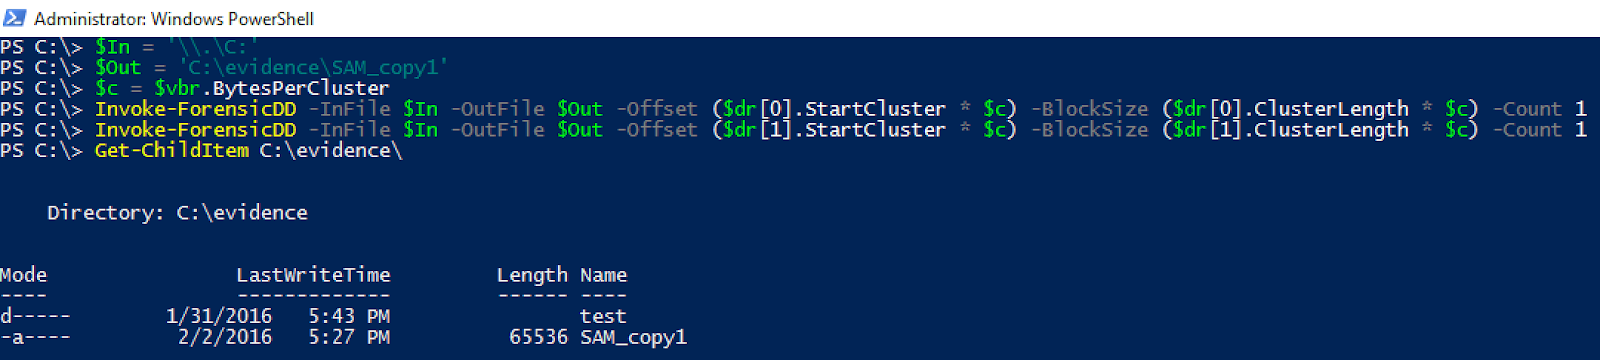
The first fragment starts at cluster 9720724 and is 2 clusters in length and the second fragment starts at cluster 12006058 and is 14 clusters in length. With this information we can use Invoke-ForensicDD to copy both fragments to a file.


Before we use Invoke-ForensicDD, let’s look check out its cmdlet help for usage instructions.


Screenshot 2016-02-02 12.10.41.png


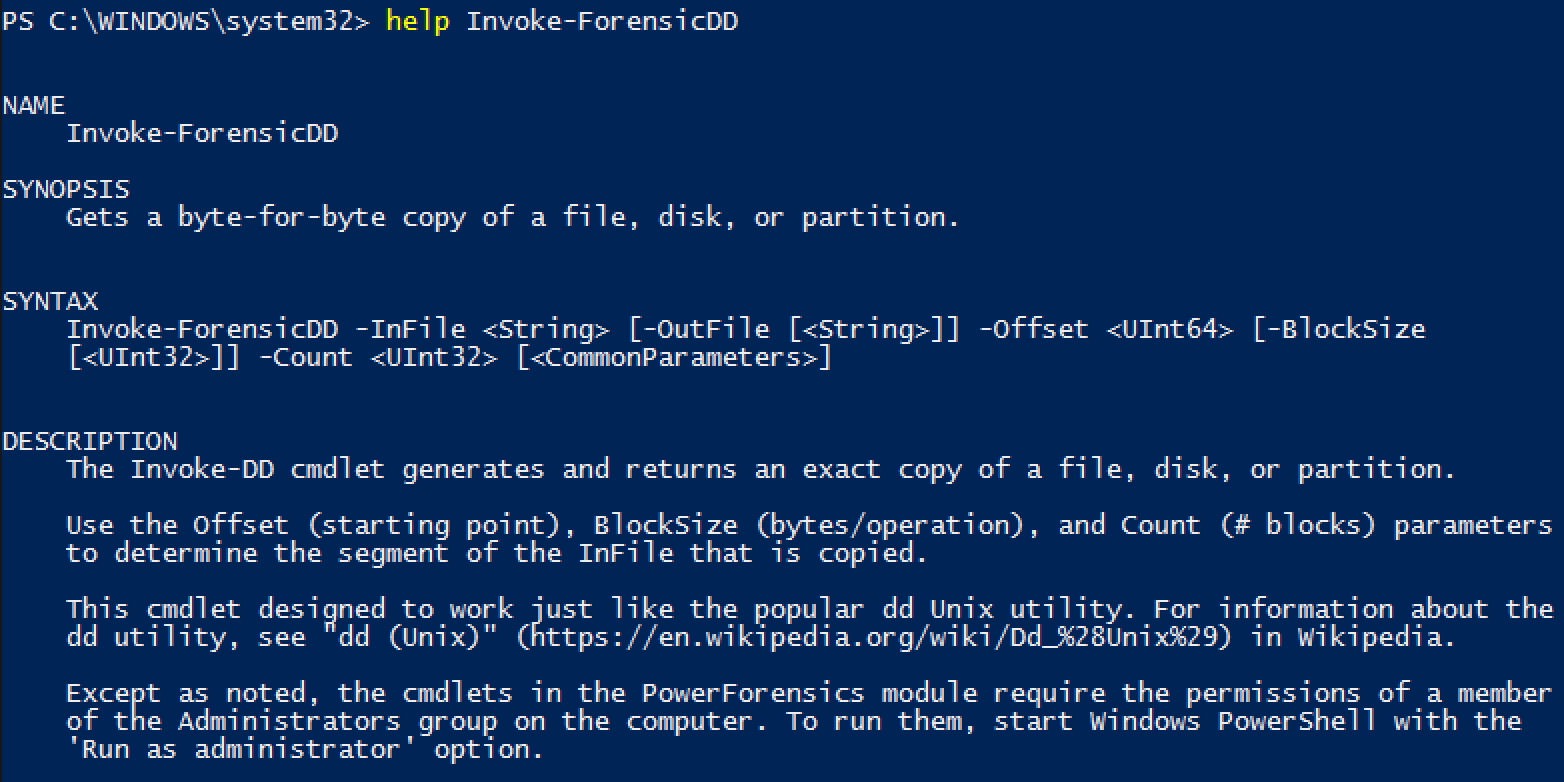
According to the help, we must provide an InFile (the file, volume, or disk to read from), an optional OutFile (the file to output the data to), an Offset (location to start reading from), BlockSize (the number of bytes to read at one time), and a Count (the number of “Blocks” to read). Since we are dealing with a fragmented file we will need to issue the command once per fragment (twice total in this example). We will be reading from the \\.\C: logical volume (InFile), and will output to C:\evidence\SAM_copy1 (OutFile). Our Offset and BlockSize parameters are derived from each DataRun. The offset will equal DataRun.StartCluster * VolumeBootRecord.BytesPerCluster or in the case of fragment 1 9720724 * 4096. The BlockSize will be DataRun.ClusterLength * VolumeBootRecord.BytesPerCluster or for fragment 1 2 * 4096. For these examples we will set Count to 1. In the image below you can see Invoke-ForensicDD is used twice, once for each fragment, to copy the SAM Hive to the evidence directory.


NOTE: In the picture below, I store a lot of information in variables. This was done to make the image easier to follow and is not 100% necessary.


Screenshot 2016-02-02 12.27.53.png


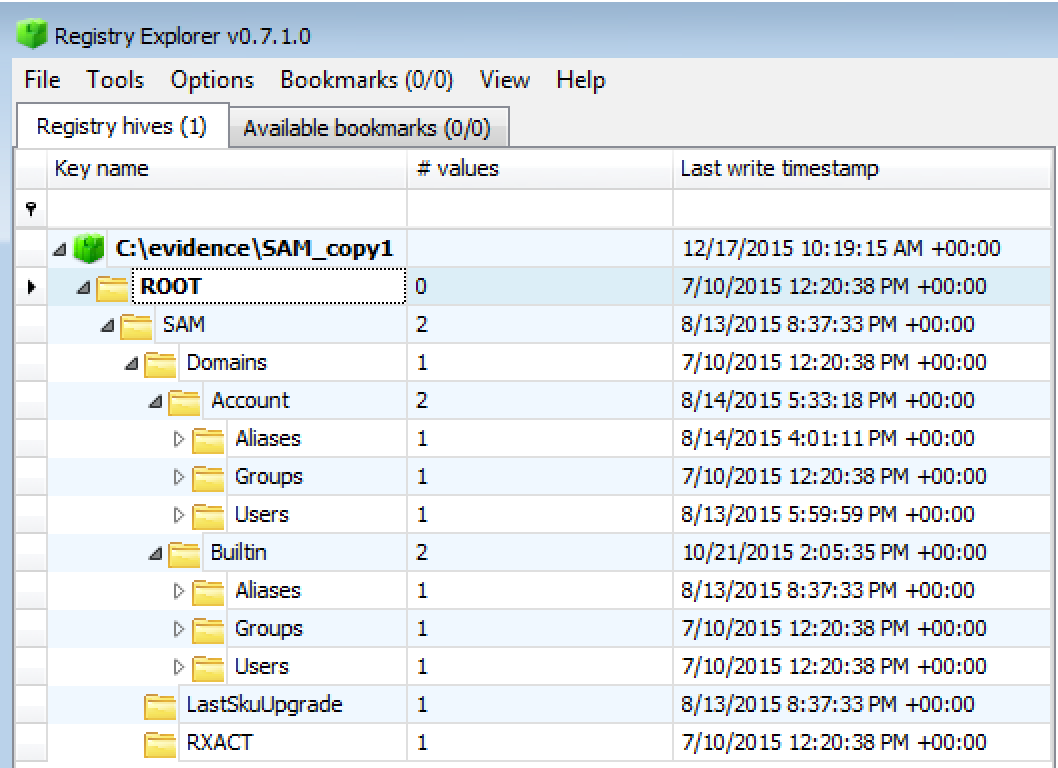
Now we can open SAM_copy1 in our favorite Registry viewer.

Method 2: CopyFile Method

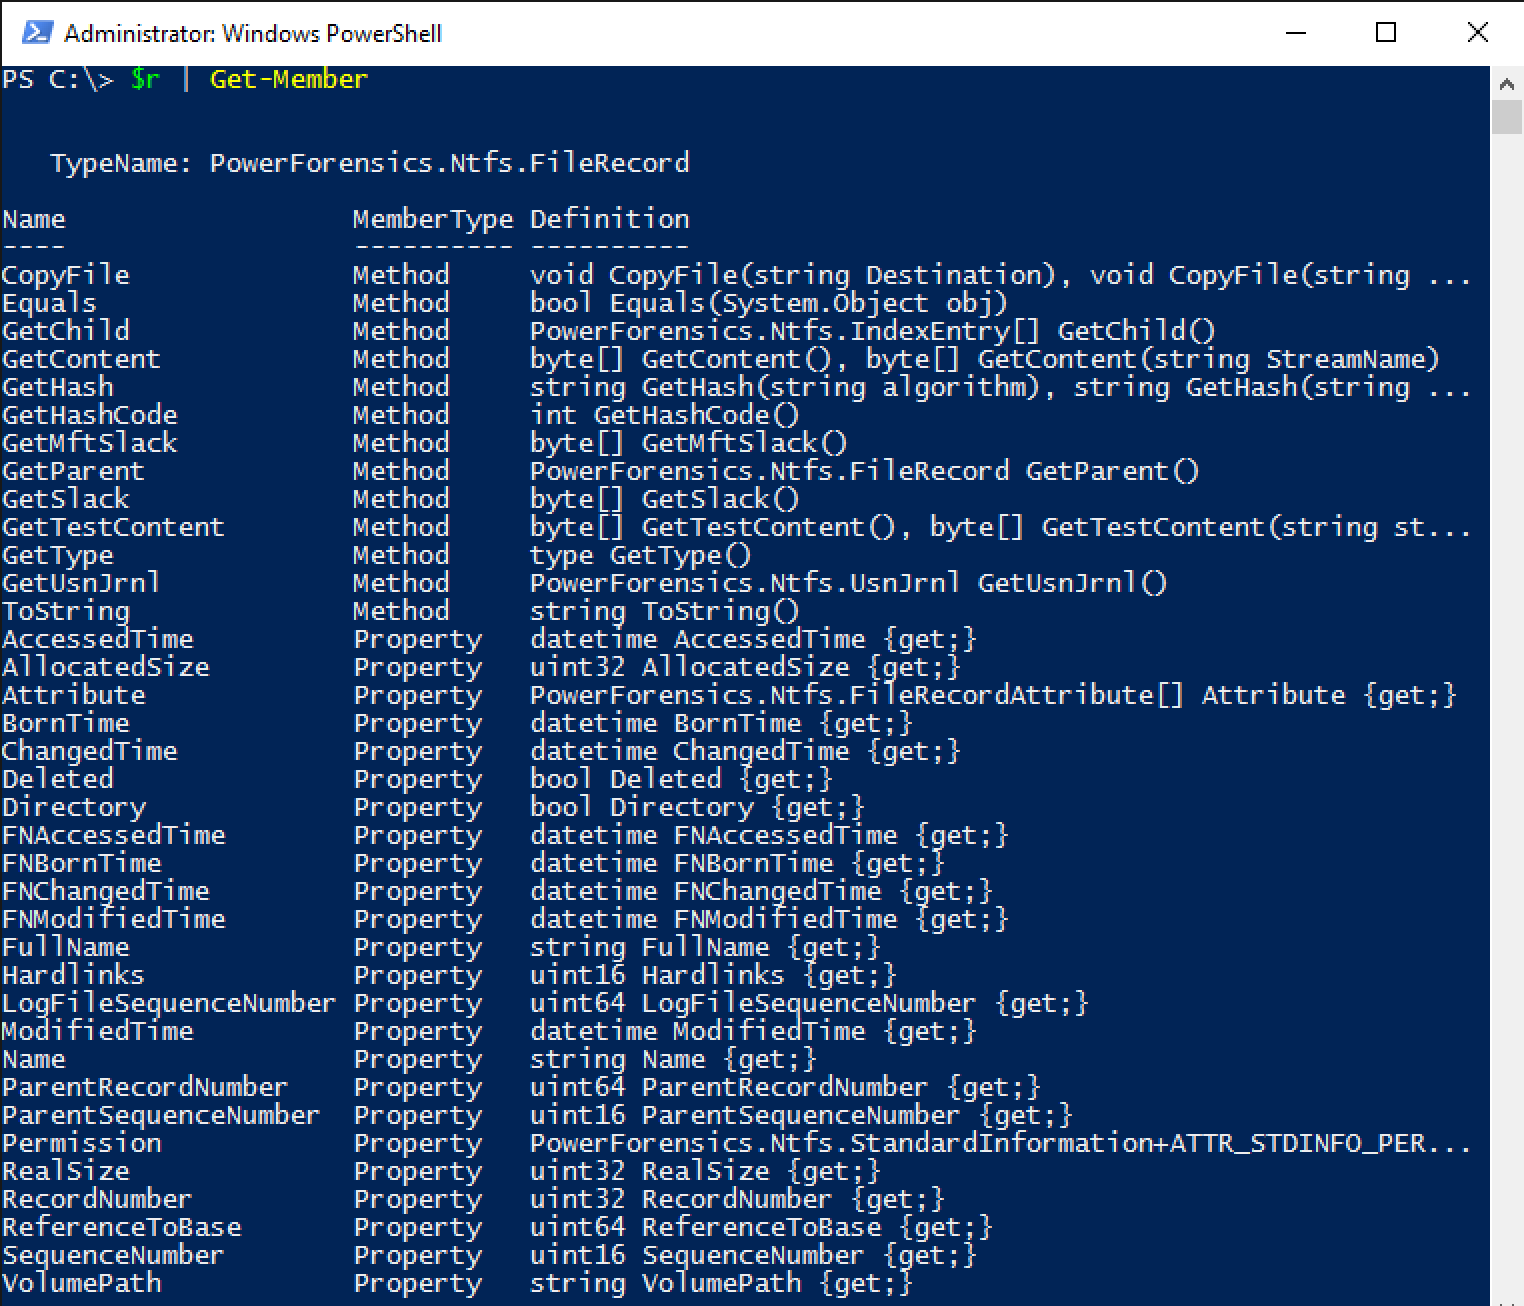
Without realizing it we already have another method set up. The PowerForensics.Ntfs.FileRecord object has CopyFile method built in. CopyFile understands the major concepts of how data is referenced in the Master File Table, so concepts like resident vs. nonresident data and fragmentation are made transparent to the user. The image below pipes our save FileRecord object into the Get-Member cmdlet which outputs a list of methods and properties that make up a FileRecord object (remember that $r is stored the result of Get-ForensicFileRecord from earlier).


Screenshot 2016-02-01 11.04.55.png


You may have noticed that the CopyFile method was the very first method in the list and that it has multiple overloads or ways to call it. To get a better view of the method overloads, and thus what arguments the method is expecting, we can call the method without parentheses as seen in the next image.


Screenshot 2016-02-02 09.14.21.png


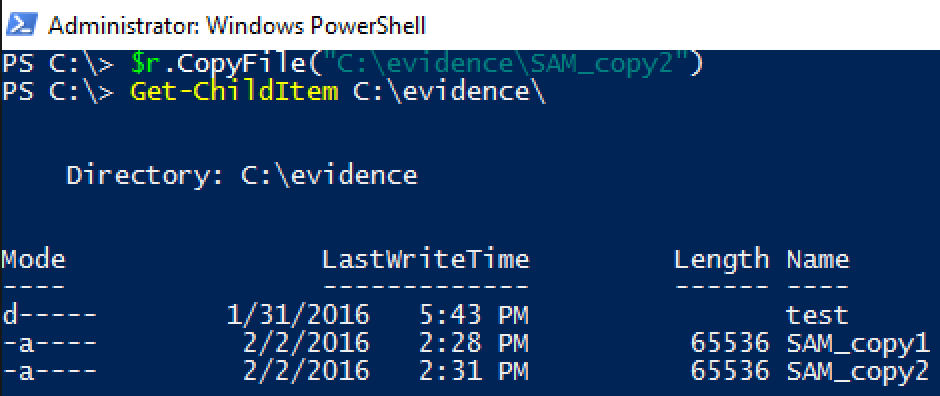
It appears that there are two ways to call CopyFile. We will be focusing on the first overload since we are dealing with the main “data stream”. If we wanted to copy a specific “data stream”, often referred to as an Alternate Data Stream, we would use the second overload. Now all we have to do is execute the method with a destination path (C:\evidence\SAM_copy2) and we end up with a perfect copy of the SAM hive.


NOTE: PowerShell requires strings to be enclosed in quotes when passing it to a method.


Screenshot 2016-02-02 09.31.44.png


There you have it, we now have SAM_copy2 in the C:\evidence directory. Looks like method 2 was successful.

Method 3: Copy-ForensicFile

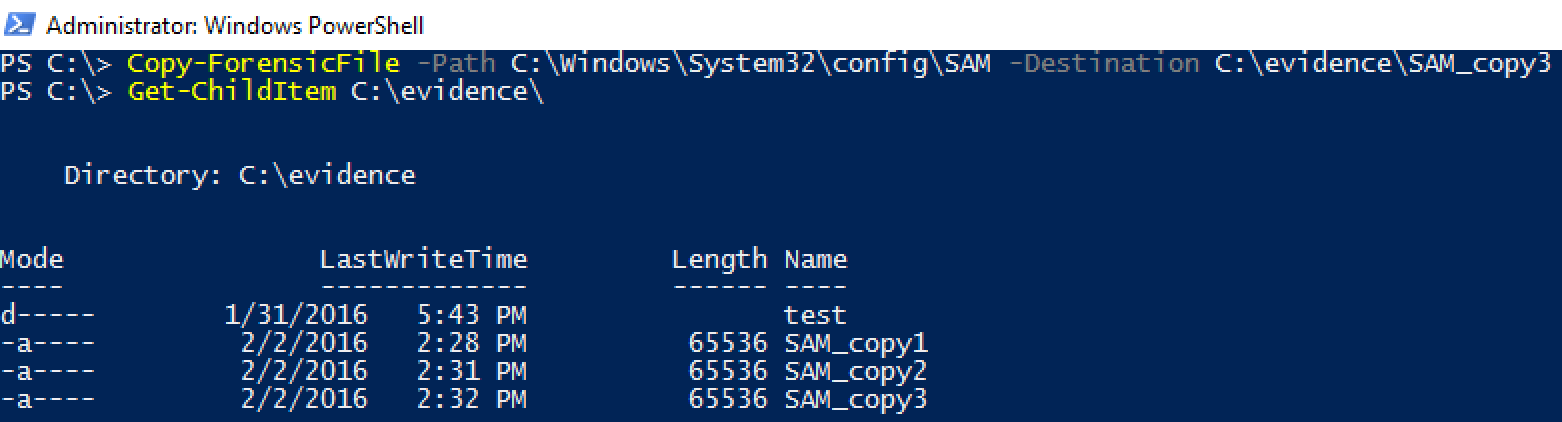
The third method provides even one more layer of abstraction to the user. The Copy-ForensicFile cmdlet requires a Path and a Destination and will do all of the work for you. In the image below, I show Copy-ForensicFile being used to copy the SAM hive to C:\evidence\SAM_copy3.


Screenshot 2016-02-02 09.33.03.png


Once again, it looks like our copy was successful. We have what we assume are three identical files that were copied using three different techniques. To check to make sure all three files are the same we run them through PowerShell’s Get-FileHash as seen below.


Screenshot 2016-02-02 09.33.43.png


Looks like all three files are identical. Now that we have copied the SAM hive we can use Eric Zimmerman’s Registry Explorer to view them.


Screenshot 2016-02-02 12.52.07.png

Looks like it opened successfully! As you might have guessed each of the three techniques build off each other. The beauty of having three different methods is the granularity of control that each gives you. Method 1 allows you to copy any arbitrary bytes from a hard drive, but may require a bit more “forensic” knowledge to know what bytes are important. Method 3 requires very little background knowledge but will accomplish the task that it is meant to accomplish. One of the cooler concepts behind PowerForensics is that this single tool can leverage each of these techniques to accomplish the next step in the analysis chain. If you want to parse the SAM hive that can be accomplished via Get-ForensicRegistryKey and Get-ForensicRegistryValue which uses the same code in the background as Copy-ForensicFile with the exception of creating an output file. Stay tuned for many more articles and blog posts on different PowerForensics capabilities and use cases.

- Invoke-IR - By Jared Atkinson -