Thursday, August 18, 2016

Installing PowerShell on OSX

Today, Microsoft announced the open sourcing of PowerShell. Not only does this mean that we (the community) can contribute to PowerShell in the form of issues and pull requests, but PowerShell is now available for OSX and *nix!
As an owner of numerous Apple products (and a perpetual PowerShell fanboy), I quickly jumped on the bandwagon and installed PowerShell on my Macbook Pro. This post walks through installing PowerShell on OSX and configuring the OSX terminal to provide a familiar PowerShell user experience.

First things first, let us take a journey to the PowerShell project on github.


From this page, you can view the source code, check out issues, and check out releases. You have the option of downloading the source and compiling it, but the PowerShell team has already done this for you. By visiting the "Releases" page, you will be presented with a list of PowerShell releases. To download the latest and greatest version, look for the the "Latest release" tag which as of this posting is v6.0.0-alpha.9.


Once you identify your desired release, scroll down to the release's download section and click on the .pkg (or Apple Software Package).


From there, it installs like any other internet application.


NOTE: If your security settings do not allow installation of applications from "non-identified developers", you will have to allow the installation of PowerShell via the Security & Privacy settings menu.

Congratulations! You have installed PowerShell on your Mac! You can now open up the Terminal App, execute /usr/local/bin/powershell (or type powershell) and start running PowerShell commands just like on Windows. After a couple hours of using PowerShell in the OSX Terminal, I found the Terminal settings to not be ideal for PowerShell (particularly the syntax highlighting). I decided to create a custom PowerShell profile to create the same familiar experience that I am used to on Windows. To do this open the Terminal preferences menu by selecting Terminal > Preferences.


We want to create a custom Terminal profile for PowerShell. In the Preferences menu, select "Profiles" and click on the + symbol in the bottom right corner. First things first, lets set our background and text colors. I chose White, Magnesium, and Cantaloupe for my Text, Bold Text, and Selection colors respectively (trying to mirror powershell.exe as much as possible).


For the Background color I selected a custom color based on Windows powershell.exe blue. You can set the color by choosing the RGB Sliders option with Hex 0x001845.


Next, I want to set this profile to automatically run PowerShell upon the Terminal starting. To do this visit the profile's "Shell" tab and enter a "Run command" of /usr/local/bin/powershell.

The last optional step is to set the PowerShell as the default Terminal profile, assuming you always want to use PowerShell like I do. This will cause the Terminal app to always start with the PowerShell profile set.


Open a new Terminal window, and you will hopefully have a fairly familiar experience!


Friday, April 1, 2016

Forensic Friday: Get-ForensicRunKey

[This article is a continuation of my Forensic Friday series.  Every Friday I will provide a short post on a forensic topic of interest or PowerForensics functionality (such as cmdlet descriptions, use cases, and details about lesser known features). Subscribe to Invoke-IR so you don’t miss a Forensic Friday!]

Vote for PowerForensics for the Forensic 4:cast Awards' Open Source Digital Forensic Software of the Year!

Now back to your regularly scheduled programming! Yesterday, Vijay (@vakasapu on Twitter) asked if we are taking feature requests (specifically regarding autoruns like features) for PowerForensics.
Let me start by saying that we are very interested in community involvement! If you have ideas to make PowerForensics better, please let me know via email (jared@invoke-ir.com) or github. While PowerForensics does not currently support the extensive list of Auto Start Extensibility Points (ASEP), we do currently support a few of the more common auto start locations. This week I want to introduce Get-ForensicRunKey which parses the registry for entries in the numerous system and user based "run" keys. This cmdlet is built on top of PowerForensics' MFT and Registry Parser, so all of this data is gathered from a live system without relying on the Window's API.
Common Use
By default, this cmdlet parses the system SOFTWARE hive and all NTUSER.DAT hives on the system’s C: volume, but can be pointed at any logical volume. Individual hives (including exported hives) can be parsed using the -HivePath parameter in order to perform offline analysis. I’ve listed a few examples below.


Parse system and user hives for Run Key Persistence:
Get-ForensicRunKey -VolumeName C: | Format-List


Parse the system SOFTWARE hive for Run Key persistence:
Get-ForensicRunKey -HivePath ‘C:\Windows\System32\config\SOFTWARE’ | Format-List

Friday, March 4, 2016

Forensic Friday: Get-ForensicChildItem

[This is a continuation of my Forensic Friday series.  Every Friday I provide a short post on a forensic topic of interest or PowerForensics functionality (such as cmdlet descriptions, use cases, and details about lesser known features). Subscribe to Invoke-IR so you don’t miss a Forensic Friday!]

Welcome to another edition of Forensic Friday. I've been incredibly busy this week, but I want to touch on a very useful cmdlet called Get-ForensicChildItem. Those with a PowerShell background can probably guess what Get-ForensicChildItem does. For those that are new to PowerShell Get-ChildItem is the cmdlet that is used for directory listings (among other things). Get-ForensicChildItem performs the same task, but without the Windows API. It parses the Master File Table (MFT) to find the entry for the target directory and outputs a list of files the directory contains.

To understand what is happening it’s important to know that NTFS treats directories just like any other file. This means that directories each have an entry in the MFT. All NTFS does to differentiate a directory file from a data file is flip a bit in a flag field and adds special $INDEX_ROOT and $INDEX_ALLOCATION attributes to the directory file’s MFT entry. Get-ForensicChildItem parses these attributes to return the contents of a directory (including System and Hidden files).

Common Use

List all children of a directory (example targets the root of the C: volume):

Get-ForensicChildItem -Path C:\

List the children of the current working directory (example uses the C:\temp directory):

Get-ForensicChildItem

Return an MFT entry for every file in a directory (example uses the root directory of the C: volume):

Get-ForensicChildItem -Path C:\ | Get-ForensicFileRecord


Friday, February 26, 2016

Forensic Friday: Get-ForensicMftSlack


[This is a continuation of my Forensic Friday series.  Every Friday I provide a short post on a forensic topic of interest or PowerForensics functionality (such as cmdlet descriptions, use cases, and details about lesser known features). Subscribe to Invoke-IR so you don’t miss a Forensic Friday!]


Happy Friday and welcome to another installment of my Forensic Friday series. This week we are going to cover PowerForensics’ Get-ForensicMftSlack, a cmdlet that returns Master File Table (MFT) slack space. For those not familiar with the concept of slack space, it is simply defined as unused space on the disk. MFT slack is specifically the unused portion of a Master File Table record entry. By default, the Master File Table is composed of records that represent a partitions files and directories. Each MFT record has a set number of bytes reserved for it on the hard drive, typically 1024 bytes (the number of bytes reserved for the MFT record entry can be found in the Volume Boot Record). When a MFT record entry does not use all of the bytes that have been allocated to it, the remaining bytes are referred to as MFT slack space, an area on disk that attackers have been known to hide their tools.

Lets use PowerForensics to provide a specific example of MFT slack space. We start by using Get-ForensicFileRecord to get a specific FileRecord object (MFT record entry). Each FileRecord object has an AllocatedSize and a RealSize parameter. AllocatedSize represents the number of bytes that have been reserved for this particular MFT file entry, while RealSize represents the number of bytes that are actually being used by the entry.


Below you can see a hex dump of the MFT File Record. You can see the FILE0 signature and a couple human readable strings (such as “access.log”).


Now if we compare the output of Get-ForensicMftSlack, we see the same data that is at the bottom of the previous picture. This is the slack space! Sometimes slack space can contain contents of deleted files or file system structures.


The image below shows that the difference between AllocatedSize and RealSize is the same as the number of bytes returned by Get-ForensicMftSlack.


Common Use

Parse all Master File Table slack space for a given volume (Example using volume “C:”):

$bytes = Get-ForensicMftSlack -VolumeName C:


Parse MFT record based on Index/Record Number (Example with Index 0 on Volume N:):

Get-ForensicMftSlack -VolumeName N: -Index 0 | Format-Hex


Friday, February 19, 2016

Forensic Friday: Invoke-ForensicDD

[This is a continuation of my Forensic Friday series.  Every Friday I provide a short post on a forensic topic of interest or PowerForensics functionality (such as cmdlet descriptions, use cases, and lesser known features). Subscribe to Invoke-IR so you don’t miss a Forensic Friday!]

Happy Forensic Friday! This week I am taking us back to the basics with Invoke-ForensicDD. Pretty much every Forensicator/Incident Responder has used the Unix dd utility during their day, but I figured it’d be pretty cool to have a PowerShell implementation. This cmdlet provides read only access to the physical disk or logical volume, and returns the requested data as a byte array.

For a practical example of Invoke-ForensicDD, check out my Copying Locked Files with PowerForensics post. Not only does this show leveraging Invoke-ForensicDD to copy a locked file, the post also shows how PowerForensics builds on this functionality to provide more user friendly APIs.

Common Use
Like the unix dd utility, Invoke-ForensicDD has an -InFile parameter that should be used to point at the physical drive (\\.\PHYSICALDRIVE0) or logical volume (\\.\C:). An optional -OutFile parameter directs the output to a file instead of PowerShell’s output stream. The -Offset, -BlockSize, and -Count parameters provide instructions regarding what data to return (-Offset and -BlockSize must be divisible by the physical disk’s sector size, typically 512 bytes). Like Unix’s dd, -BlockSize represents the number of bytes to read at one time while -Count represents the number of BlockSize chunks to read. By default, -Offset has a value of 0 (the beginning of the file) and -BlockSize has a value of 512 (the smallest number of bytes that can be read at once).

This example reads 512 bytes from the beginning of the physical disk (\\.\PHYSICALDRIVE0) and passes the output to Format-Hex:

Invoke-ForensicDD -InFile \\.\PHYSICALDRIVE0 -Count 1 | Format-Hex


Read the first 512 bytes from the logical volume (\\.\C:) and write output to C:\evidence\VBR:

Invoke-ForensicDD -InFile \\.\C: -OutFile C:\evidence\VBR -Offset 0 -BlockSize 512 -Count 1


Thursday, February 18, 2016

Installing PowerForensics

If you are following my Forensic Friday posts, you probably know that I am making a concerted effort to write about my projects more frequently. PowerForensics has been the main focus of my blogging thus far in 2016, but I have not released a post describing how to "install" it. The rest of this post provides walkthroughs of installing PowerForensics from either the PowerShell Gallery or Github and why you would choose one method over the other.

Method 1: PowerShell Gallery

By far, the easiest way to install a PowerShell module is from the PowerShell Gallery. For anyone unfamiliar with the PowerShell Gallery, is described as "the central repository for PowerShell content" meaning PowerShell community members can host their code (modules, DSC resources, and scripts) on the Gallery. The major caveat with PowerShell Gallery is that the necessary cmdlets are only available in Window Management Framework (WMF) 5.

The image below shows the PowerForensics project page which includes details about the module such as the current version, release notes, and installation instructions.


To locate a module from the command line, use the Find-Module cmdlet with a keyword. In the example below, I search for any module whose name contains the word "Forensic". This query shows me that there are two modules PowerForensics and PowerForensicsv2 (PowerForensicsv2 is the PowerShell v2 compliant version of PowerForensics).


Once you have located the desired package, use Install-Module to download and install it (notice that I used the command from the Install section of the PowerShell Gallery project page). Install-Module will prompt you to make sure you know that you are downloading a module from the internet to which you should select "A". By default, the module will be installed in the %ProgramFiles%\WindowsPowerShell\Modules directory, which makes it available for all users. If you want the module to be accessible to only the current user  you can specify -Scope CurrentUser with Install-Module and it will be installed in the %UserProfile%\Documents\WindowsPowerShell\Modules directory.


Once PowerForensics is installed, we can use Import-Module to load the module into our current session and Get-Command, with the -Module parameter, to list the cmdlets exposed by the module.


Method 2: Github

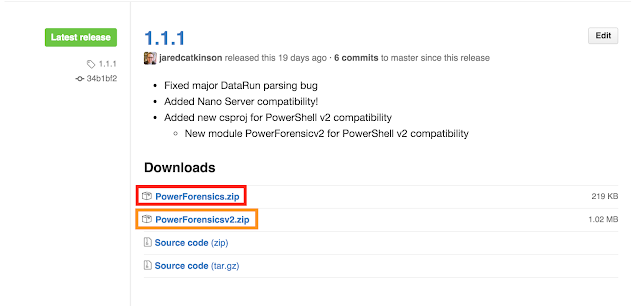
Github is a popular code distribution site and also another way to download PowerForensics. Each major release contains three zip files; PowerForensics.zip, PowerForensicsv2.zip, and Source code. (Same as above, PowerForensicsv2 is the PowerShell v2.0 compliant version)
 

If you downloaded PowerForensics with Internet Explorer, you must “Unblock” the files. This can be accomplished by right clicking on the file and selecting properties. From the properties menu, check the Unblock box and click Apply

This step is necessary because Internet Explorer adds an Alternate Data Stream (ADS) named Zone.Identifier to all files downloaded through the browser. The Zone.Identifier indicates what security zone the file was downloaded from. PowerShell requires user interaction for all files downloaded from the internet, so unblocking allows us to skip this tedious step.


To finish installing PowerForensics, unzip the module into a directory in the PSModulePath like C:\Program Files\WindowsPowerShell\Modules\ import and go! For more information about PSModulePath check out this article.


You are now ready to use the PowerForensics PowerShell module! Subscribe to Invoke-IR to make sure you get the latest PowerForensics tricks and tips.


Friday, February 12, 2016

Forensic Friday: Get-ForensicUsnJrnl

[This article is a continuation of my Forensic Friday series.  Every Friday I will provide a short post on a forensic topic of interest or PowerForensics functionality (such as cmdlet descriptions, use cases, and details about lesser known features). Subscribe to Invoke-IR so you don’t miss a Forensic Friday!]

Welcome back to Forensic Friday! This week I want to highlight the Get-ForensicUsnJrnl cmdlet, which parses the $UsnJrnl file or NTFS change journal.The UsnJrnl is responsible for keeping track of file system operations such as file creation, deletion, and truncation. During an investigation I highly recommend inspecting the $UsnJrnl as it provides extremely detailed context about what has transpired on the file system. For example, this is especially helpful in providing details about a deleted and otherwise unrecoverable file.

Common Use

By default, this cmdlet parses the $UsnJrnl file (\$Extend\$UsnJrnl) on the system’s C: volume, but can be pointed at any logical volume. An exported $UsnJrnl file can be parsed using the -Path parameter in order to perform offline analysis. I’ve listed a few examples below. The -Usn parameter tells Get-ForensicUsnJrnl to parse and return a single entry.


Parse a volume’s UsnJrnl & store in $usn variable (Example using volume “C:”):
$usn = Get-ForensicUsnJrnl -VolumeName C:


Parse $UsnJrnl file based on path & store in $usn variable (Example path C:\$Extend\$UsnJrnl):
$usn = Get-ForensicUsnJrnl -Path ‘C:\$Extend\$UsnJrnl’

Parse $UsnJrnl entry based on Update Sequence Number (Example with Usn #1189553536):
Get-ForensicUsnJrnl -VolumeName C: -Usn 1189553536


Friday, February 5, 2016

Forensic Friday: Get-ForensicFileRecord

[This is the first article in my Forensic Friday series.  Every Friday I will provide a short post on a forensic topic of interest or PowerForensics functionality (such as cmdlet descriptions, use cases, and details about lesser known features). Subscribe to Invoke-IR so you don’t miss a Forensic Friday!]

Lets start with Get-ForensicFileRecord, the PowerForensics cmdlet I tend to use the most.  This cmdlet parses the Master File Table (MFT) of an NTFS formatted volume (more formats are in the works).  This function provides the base for all other NTFS based PowerForensics cmdlets and allows an analyst to perform a variety of different tasks (finding files, recovering deleted files, detecting timestomping, etc).  As always, please leave any questions or comments about this post below, maybe you’ll inspire the next Forensic Friday post!

Common Use

By default, this cmdlet parses the $MFT file on the system’s C: volume but can be pointed at any logical volume. The -Index and -Path parameters tell Get-ForensicFileRecord to parse and return a single MFT File Record. Lastly, an exported $MFT file can be parsed using the -MftPath parameter in order to perform offline analysis. I’ve listed a few examples below.

Parse a volume’s Master File Table and store in $mft variable (Example using volume “C:”):
$mft = Get-ForensicFileRecord -VolumeName C:

Parse MFT record based on Index/Record Number (Example with Index 0):
Get-ForensicFileRecord -Index 0

Parse MFT record based on file path (Example with C:\Windows\System32\config\SAM):
Get-ForensicFileRecord -Path C:\Windows\System32\config\SAM

Parse an exported Master File Table (Example for C:\evidence\MFT):
$mft = Get-ForensicFileRecord -MftPath C:\evidence\MFT


- Invoke-IR - By Jared Atkinson -